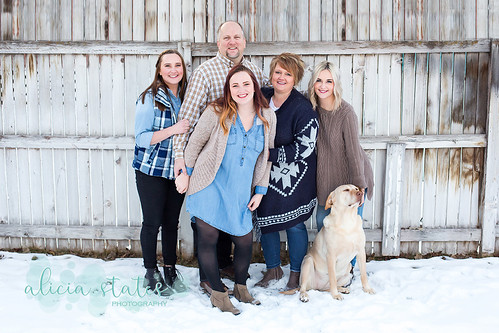
I adore this family. I've been taking pictures of these kiddos for
about 7 years now! We've done train tracks, gardens, and canyon parks (to name
a few places) so this time we tried something different! SNOW! I guess it was
meant to be because that morning we got a LOT of snow!
Showing posts with label Photography Tips. Show all posts
Marsing Family, Winter Family Photos
January 23, 2017
6 Tips to Get Great Pictures of Kids!
November 21, 2016
Kids.
Oh, kids.
They can be exasperating to work with.
Let's be honest, a happy child is the most wild, free spirited thing you'll ever know and will hardly sit still or look at a camera long enough to say cheese. BUT if you know a few tricks they can be the most beautiful, magical creatures you've ever worked with!
Here's a few things I've learned that make photographing kids my favorite! (And they don't even have to smile...)
Connect. You have to have to connect with them somehow. If you connect with them they will be more likely to respond to your direction.
1. Be FUN - throw leaves with them. Play a game of making faces. High five them - a lot!
I think it's really important to know their names, and use it a lot!
2. Change it up. K, now jump around. Look at mom. Make a silly face. Now give me your best smile! Now stop smiling and freeze…. Work with their short attention spans! They're guaranteed to get a little cranky (or maybe a lot) if they are expected to sit still and hold a, now fake, smile.
3. Give them breaks. Again, work with their short attention spans, and give them quick breaks to run around or get a drink or go to mom
4. Encourage good behavior. If mom and dad haven’t already bribed - I mean encouraged - them to be (generally) well behaved, then figure out some kind of reward. Small candies (with parents' permission) like smarties (NO CHOCOLATE) or pez work miracles. If candy is a no-go, simple rewards like hopping up and down can feel like a reward (and also goes along with "give them breaks").
5. Don't make them smile in every shot. Sometimes I like to tell the kids, "don't worry about smiling, just look at me like you're listening." Or, "don't worry about looking at the camera right now... why don't you look at _____________?"
6. Follow them around. Let the kid(s) set the pace for a little bit and follow his or her lead. Ask for their ideas, and go with them. If there is a child who just refuses to cooperate you might be amazed at how they change when they feel like they are in charge! Action shots are another great way to capture their personalities. Follow them around and snap away!
No matter what you do, don't forget to breathe. Don't rush through the experience, try to enjoy it and create those portraits that will be timeless for them and possibly generations to come!
You've totally got this!
What are some of your tricks to get great pictures of kids?
What other challenges do you want to overcome in your portrait photography?
You've totally got this!
What are some of your tricks to get great pictures of kids?
What other challenges do you want to overcome in your portrait photography?
Want to take better pictures? Tips from Alicia.
September 13, 2013
I always have friends asking me about their cameras or telling me that they want to learn how to take better pictures. Now, I'm no expert, but I have learned a thing or two in the 8 years I've been shooting with DSLR. I started with a Canon Rebel with the kit lens, and now shoot with a Canon 40D and my primary lens is a 50mm f/1.4. I started shooting M about 5 years ago, and have been shooting RAW for a year now.
If you didn't understand what I just said, that's ok. This post is for you. :)
(If you're more into the post editing part here is a quick post I did a year ago. )
Here are a few tips, thoughts and suggestions I have for you.
1. It doesn't matter what kind of camera you have if you don't know how to use it.
If you're serious about taking your photography skills to the newt level, learn how to control the settings on your camera whether you use a phone camera, dslr, point and shoot... get out that manual or play with the settings (BUT SAVE YOUR IMAGES FIRST!).
2. The difference between an "okay" image and a really great one is usually the lighting.
Learn about ISO, Aperture and Shutter Speed. Those are the three factors to controlling the light within your camera. It doesn't matter how cute your kid is, or how gorgeous your subject, if the lighting is "blah" it won't catch anyone's eye like you want it to. HERE is a good article that explains "exposure".
3. Get closer!
The few times I've taught a basic photography class, this is the first thing I talk about! Get closer! Get closer with your feet or by zooming in. Get close enough to crop out the distracting background and fill the image with your subject! When you first start practicing this, you may want to take pictures of your subject in 5-10 different angles and focal lengths.
4. Be aware of your background.
Do you want people in the background? Half of the building? The pole?
Be aware of the random things behind your subject. The idea is to eliminate anything that will not compliment your subject. Be aware of things that will distract attention from your subject.
5. Practice Practice Practice!
You'll never get better if you don't try. Go out for a walk and practice! Then, take the time to analyze your images. Take notes (mental or literal) on ways you could improve an image. What do you like about your image? What would you change or wish you had done differently? I promise that if you do this regularly you will really see improvement in your images!
What have you learned about creating better images? What have you done to improve your photography skills?
If you didn't understand what I just said, that's ok. This post is for you. :)
(If you're more into the post editing part here is a quick post I did a year ago. )
Here are a few tips, thoughts and suggestions I have for you.
1. It doesn't matter what kind of camera you have if you don't know how to use it.
If you're serious about taking your photography skills to the newt level, learn how to control the settings on your camera whether you use a phone camera, dslr, point and shoot... get out that manual or play with the settings (BUT SAVE YOUR IMAGES FIRST!).
2. The difference between an "okay" image and a really great one is usually the lighting.
Learn about ISO, Aperture and Shutter Speed. Those are the three factors to controlling the light within your camera. It doesn't matter how cute your kid is, or how gorgeous your subject, if the lighting is "blah" it won't catch anyone's eye like you want it to. HERE is a good article that explains "exposure".
3. Get closer!
The few times I've taught a basic photography class, this is the first thing I talk about! Get closer! Get closer with your feet or by zooming in. Get close enough to crop out the distracting background and fill the image with your subject! When you first start practicing this, you may want to take pictures of your subject in 5-10 different angles and focal lengths.
Do you want people in the background? Half of the building? The pole?
Be aware of the random things behind your subject. The idea is to eliminate anything that will not compliment your subject. Be aware of things that will distract attention from your subject.
5. Practice Practice Practice!
You'll never get better if you don't try. Go out for a walk and practice! Then, take the time to analyze your images. Take notes (mental or literal) on ways you could improve an image. What do you like about your image? What would you change or wish you had done differently? I promise that if you do this regularly you will really see improvement in your images!
What have you learned about creating better images? What have you done to improve your photography skills?
My Top Online Photography Resources
September 15, 2012
I have never taken a photography class, though I would love to.
In retrospect, my learning process has been slow and often frustrating. I'm sure at least one class would have saved me months or years of trial and error.
Be that as it may, I have always loved photography. I love seeing something (without a camera) and think, I know how I would want to capture that. Capturing it the way I imagine is the challenge.
Not to say I haven't had help! Years ago, I was able to spend some time with the talented Naomi Masina and it changed my life. Among the invaluable advice she gave, learning to use the functions of my camera (learning to shoot in "M") changed everything about my photography - for the best.
While some of the help I've received is from real people in real life, most of the resources I go to are online.
A few of my favorites are:
Digital Photography School
I get weekly emails from DPS that I look forward to. There are tutorials for days on technique, post editing, and the business side of photography. There are weekly assignments and contests which can be fun. This is the site I go to most often.
Another great site is
Improve Photography
and I regularly keep up with all the information that is readily shared on
The Utah Photographers Group on Facebook.
You can organize and find so many tutorials and ideas from many different sources on Pinterest as well. Whether you're the DIY (Do It Yourself) kind of person or want to invest in a photographer you can gather inspiration and take your images to the next level.
These are only a few of the thousands out there. Because of all the talent and resources out there, it can be downright intimidating. I try not to let myself get caught up in the idea of competing with other photographers, and instead try to share what little I've learned with those who can benefit from it.
Photography isn't my life, it is my passion. My family is my number one priority and anytime photography needs to, it can take a back seat (for a long while if needs be).
I think (hope!) there will be a season in my life where I will be able to take those classes I never did and pursuit my dream of running a successful, "full-time" photography business!
In the mean time, I will just keep doin' what I'm doin'!
In retrospect, my learning process has been slow and often frustrating. I'm sure at least one class would have saved me months or years of trial and error.
Be that as it may, I have always loved photography. I love seeing something (without a camera) and think, I know how I would want to capture that. Capturing it the way I imagine is the challenge.
Not to say I haven't had help! Years ago, I was able to spend some time with the talented Naomi Masina and it changed my life. Among the invaluable advice she gave, learning to use the functions of my camera (learning to shoot in "M") changed everything about my photography - for the best.
While some of the help I've received is from real people in real life, most of the resources I go to are online.
A few of my favorites are:
Digital Photography School
I get weekly emails from DPS that I look forward to. There are tutorials for days on technique, post editing, and the business side of photography. There are weekly assignments and contests which can be fun. This is the site I go to most often.
Another great site is
Improve Photography
and I regularly keep up with all the information that is readily shared on
The Utah Photographers Group on Facebook.
You can organize and find so many tutorials and ideas from many different sources on Pinterest as well. Whether you're the DIY (Do It Yourself) kind of person or want to invest in a photographer you can gather inspiration and take your images to the next level.
These are only a few of the thousands out there. Because of all the talent and resources out there, it can be downright intimidating. I try not to let myself get caught up in the idea of competing with other photographers, and instead try to share what little I've learned with those who can benefit from it.
Photography isn't my life, it is my passion. My family is my number one priority and anytime photography needs to, it can take a back seat (for a long while if needs be).
I think (hope!) there will be a season in my life where I will be able to take those classes I never did and pursuit my dream of running a successful, "full-time" photography business!
In the mean time, I will just keep doin' what I'm doin'!
Post Editing. Some Maternity Shots & Photography Tips
September 12, 2012
I was proud to tell people "I don't even use Photoshop". I felt confident about getting the images I wanted in-camera with slight post-editing (in any program but Photoshop).
Well, I now use Photoshop and I have never looked back!
I still only do slight editing but I have also unlocked previously unimaginable possibilities!
And then, I finally took the leap and started shooting in "RAW".
Holy smokes, it pretty much rocks my photography world.
I can do the slight editing I have previously been unable to do even with my limited Photoshop knowledge. It's so cool!
Here are a few samples of my mad editing skills (jk jk, I'm still a super-novice when it comes to shooting RAW and any kind of impressive post editing has yet to become a strength). But I will say that I am pleased with the results.
My husband took these for me (yes, he's the bomb dot com). I set up the camera settings in Manual and let him shoot away (in RAW) where I was able to make them look the way I wanted).
You may or may not care much about post editing, but I am excited about these and wanted to share!
My humble suggestion to aspiring photographers: First, SHOOT MANUAL. Develop your relationship with your camera so you can get as close to perfection as possible IN CAMERA. Don't rely solely on post-editing. When you feel good about what you see in the camera - then start shooting RAW. It will blow your mind. :-)
Well, I now use Photoshop and I have never looked back!
I still only do slight editing but I have also unlocked previously unimaginable possibilities!
And then, I finally took the leap and started shooting in "RAW".
Holy smokes, it pretty much rocks my photography world.
I can do the slight editing I have previously been unable to do even with my limited Photoshop knowledge. It's so cool!
Here are a few samples of my mad editing skills (jk jk, I'm still a super-novice when it comes to shooting RAW and any kind of impressive post editing has yet to become a strength). But I will say that I am pleased with the results.
My husband took these for me (yes, he's the bomb dot com). I set up the camera settings in Manual and let him shoot away (in RAW) where I was able to make them look the way I wanted).
You may or may not care much about post editing, but I am excited about these and wanted to share!
My humble suggestion to aspiring photographers: First, SHOOT MANUAL. Develop your relationship with your camera so you can get as close to perfection as possible IN CAMERA. Don't rely solely on post-editing. When you feel good about what you see in the camera - then start shooting RAW. It will blow your mind. :-)
Subscribe to:
Posts (Atom)